Écoute via dispositif Android


1
Table des matières
Règles d’usage des dispositifs audio
•Selonl’endroit,mêmeunemusiqueagréablepeutdéranger.Protezdevotremusiqueàunvolumeapproprié,andenepas
dérangervotrevoisinage.
•Enparticulierlanuit,lamusiquepeuts’entendredeloin,mêmeàvolumefaible.Merciderespectervotrevoisinageetde
contribueràmaintenirunenvironnementplaisant.
Lesexemplesd’écransdecemoded’emploipeuventêtredifférentsdesécransquis’afchentréellement.
Éléments inclus ……………………… 2
Prises …………………………………… 3
Préparation des enceintes ………… 4
Ajustementdel’angledel’enceinte ………4
Fixationdesletsdeprotection……………4
Connexionàl’alimentation …………………4
Connexion des dispositifs de
lecture ………………………………… 5
Lecture via Wi-Fi (réseau sans fil) … 6
Moderouteur(recommandé)………………6
Modedirect …………………………………6
Utilisation de la TD-M1 ……………… 7
Afchagedestémoins(aucentre)…………7
Misesousouhorstension…………………7
Veillederéseau………………………………7
Fonctiondeveilleautomatique ……………7
Fonctiondemisesoustension
automatique …………………………………7
Réglageduvolume …………………………8
Modicationdelasource……………………8
Alternancedesmodesdeconnexionde
lectureWi-Fi(sansl) ………………………8
Écoute via AirPlay …………………… 9
Connexion ……………………………………9
Connexionàl’aidedumodedirect ……… 9
Connexionàl’aidedumoderouteur……… 9
Safari(DispositifiOS) ……………………… 9
Safari(Mac) ………………………………… 9
Internetexplorer(Windows) ……………… 9
Lecture …………………………………… 11
DispositifiOS …………………………… 11
iTunes……………………………………… 11
Écoute via dispositif Android …… 12
Installationdel’applicationAndroid …… 12
Connexion ………………………………… 12
Connexionàl’aidedumodedirect …… 12
Connexionàl’aidedumoderouteur…… 13
Lecture …………………………………… 14
Formatslisibles…………………………… 15
Écoute via connexion
USB/AUX …………………………… 16
ConnexionetlectureviaUSB(TypeA)… 16
ConnexionetlectureviaUSB(TypeB)… 16
Formatslisibles…………………………… 16
Mac………………………………………… 16
PCWindows……………………………… 17
Windows7,8……………………………… 18
WindowsXP……………………………… 18
ConnexionetlectureviaAUX…………… 19
Ouverture de l’écran de
paramètres du dispositif audio de
réseau TD-M1 ……………………… 20
UtilisationdeSafarisurunMac………… 20
UtilisationdeRéseausurWindows7,
Windows8 ……………………………… 20
UtilisationdesFavorisréseausur
WindowsXP……………………………… 21
Utilisationd’undispositifiOS/Android… 21
Véricationetmodicationdes
paramètresréseau ……………………… 22
ÉcranDétailsduPériphérique ………… 22
ÉcranParamètresduRéseau…………… 23
Miseàjourdulogiciel …………………… 24
Réinitialisation de la TD-M1 …… 25
Entretien …………………………… 25
Dépannage ………………………… 25
Marque commerciale …………… 25
Observation concernant la
directive DEEE …………………… 25
Caractéristiques …………………… 26
TD-M1……………………………………… 26
Adaptateursecteur ……………………… 26
Antenna…………………………………… 26
Licence ……………………………… 27
FLACDecoder…………………………… 27
Ogg/VorbisDecoder……………………… 27
2
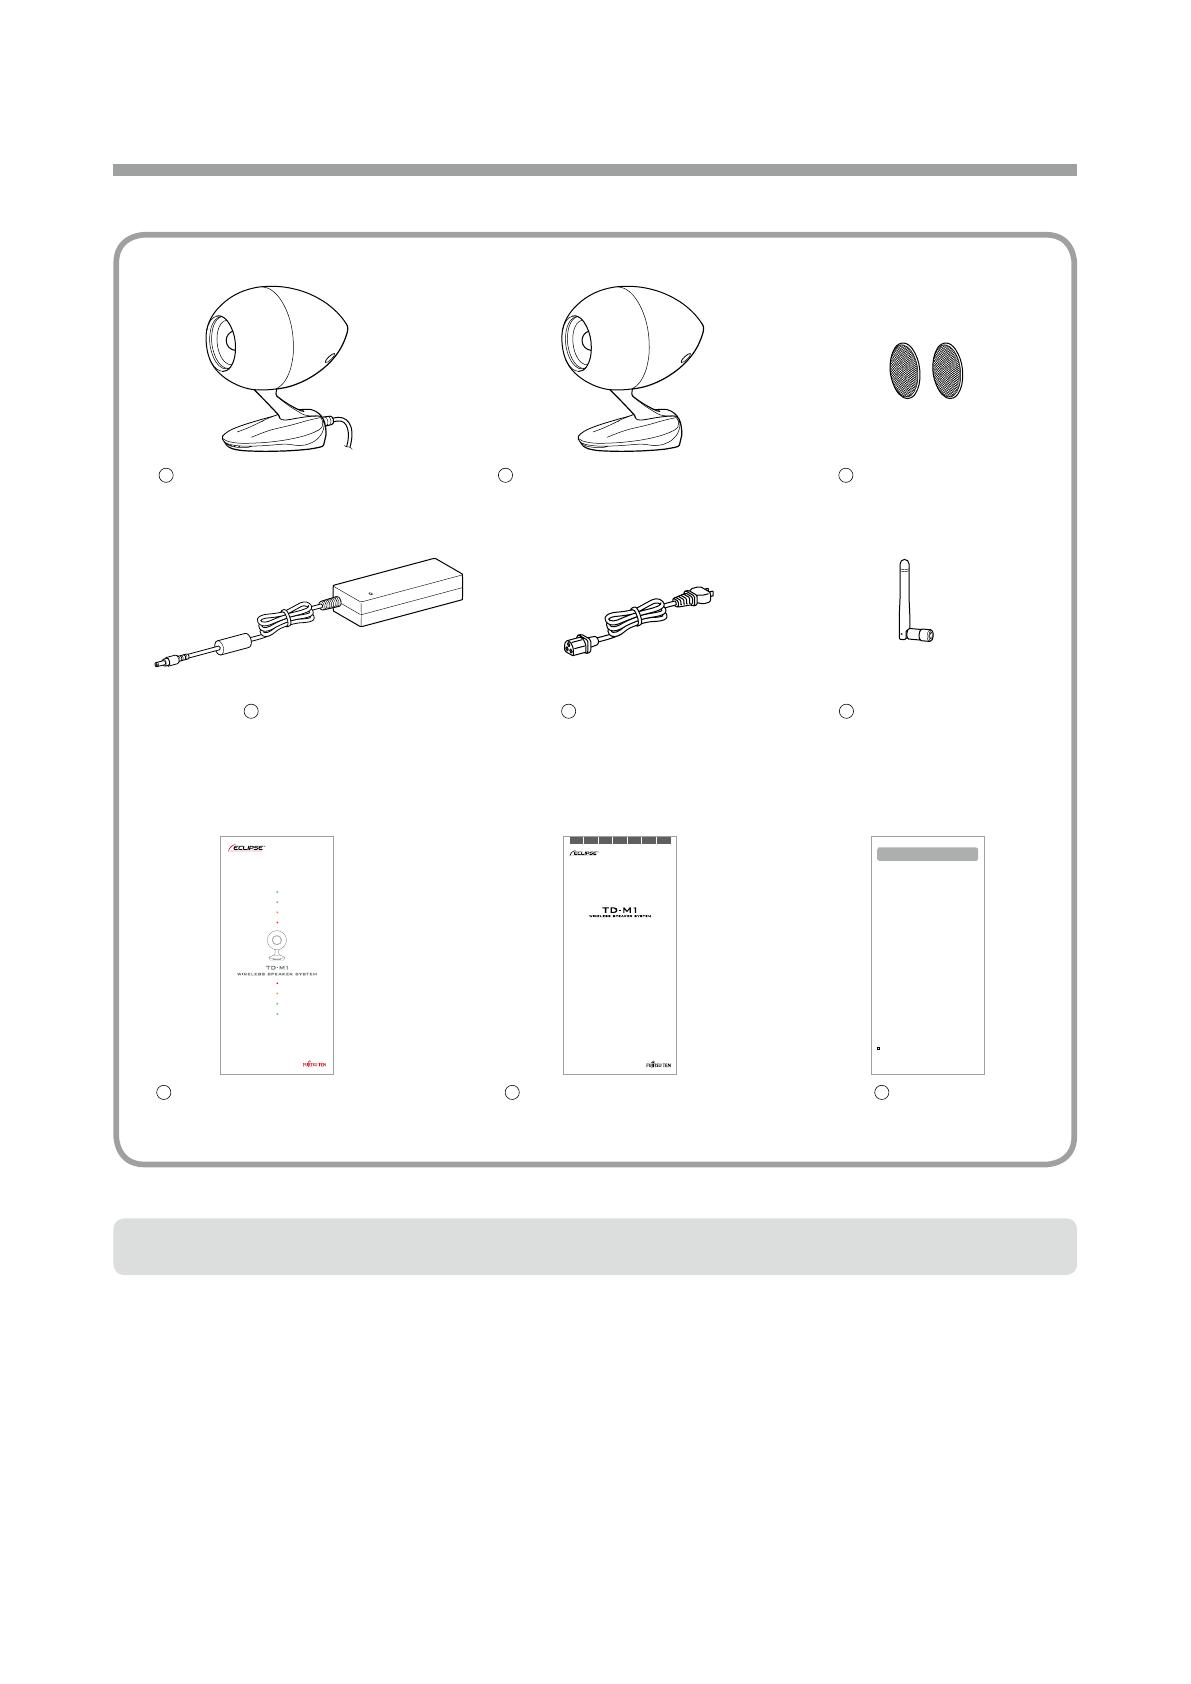
Éléments inclus
Assurez-vousquelesélémentssuivantssontinclusdansl’emballageavantd’utiliserceproduit.
1
Enceintedroite(canaldroit)1
2
Enceintegauche(canalgauche)1
3
Filetdeprotection2
6
AntenneWi-Fi®1
Siunélémentestmanquantouendommagé,veuillezcontactervotrerevendeur.
7
Guided’installationrapide1
JP EN DE FR IT ES PT
安全上のご注意とアフターサービスについて
Important Safety Instructions and After-Sales Service
Wichtige Hinweise zur Sicherheit und Kundendienst
Importantes instructions de sécurité et service après-vente
Importanti istruzioni di sicurezza e assistenza post-vendita
Instrucciones importantes de seguridad y servicio de posventa
Instruções de Segurança Importantes e Serviço Pós-Venda
FUJITSU TEN LIMITED One (1) Year Limited Warranty
Terms and Conditions of warranty
(Two (2) Years limited warranty only in the countries of European Union (EU))
1. When warranty becomes effective
This warranty becomes effective from the date at which the product was originally purchased.
2. What warranty covers
We will repair the product (“Product”) manufactured by FUJITSU TEN LIMITED to which this warranty
relates, if it is agreed there are any defects in material or in manufacturing, at no charge (“Warranty
Repair”) based upon the period and the conditions stated herein. We will repair the Product as a
Warranty Repair. Any removed defective parts will become the property of FUJITSU TEN LIMITED.
3. Warranty Period
The One (1) year, (Two (2) years in EU) limited warranty, commences on the date the Product was
purchased with a valid receipt.
4. How to obtain a Warranty Repair
In the first instance you should contact your original retailer of the Product who may be able to assist
in resolving your issue. If the issue was not resolved, please contact FUJITSU TEN LIMITED as listed
in the owner’s manual or on our Web support page (http://www.eclipse-td.net/), along with the receipt,
for Warranty Repair.
5. What is NOT covered by this warranty
We will make a charge, even if the Product is within the Warranty Period, for any repair under the
following circumstances:
a. No original proof of purchase is available.
b. No indication herein of purchase date, name of customer or name of shop.
c. Replacement of consumables (e.g. batteries)
d. Any evidence of modification and/or tampering with the original serial number.
e. Any damage caused by:
·Misuse outside of the handling methods indicated in the owner’s manual, poor maintenance
or service by the customer, cosmetic damage or any modification of the Product.
· Malfunction of another manufacturers product when in use with our Product.
·External factors such as fire, pollution, chemical cleaner, abnormal voltage, use of a power
supply providing non-rated voltage or frequency, earthquake, thunder, lightning, wind or flood
damage, or other such natural disasters.
f. Any other use that could reasonably be considered how the Product was not originally intended
to be used.
·Shipping cost to FUJITSU TEN LIMITED including postage, packaging materials and handling.
· Any damage during shipping.
·Unauthorized repair or modification performed by non-authorized FUJITSU TEN LIMITED
repair facility.
6. WHERE THIS WARRANTY IS VALID
This warranty is applicable in the country of original purchase.
7. WARRANTY DISCLAIMER AND LIMITATION
THIS WARRANTY STATEMENT FOR THE PRODUCT AND THE SOFTWARE IS IN LIEU OF ALL
WARRANTIES, EXPRESS, IMPLIED OR STATUTORY INCLUDING BUT NOT LIMITED TO ANY IMPLIED
WARRANTIES OF MERCHANTABILITY OR FITNESS FOR A PARTICULAR PURPOSE ON THE PRODUCT.
ALL IMPLIED OR STATUTORY WARRANTIES, TO THE EXTENT THAT THEY CANNOT BE EXCLUDED,
ARE LIMITED TO THE EFFECTIVE PERIOD OF THE EXPRESS WARRANTY SET FORTH HEREIN. IF THE
PRODUCT IS DEFECTIVE IN MATERIALS OR WORKMANSHIP, YOUR SOLE AND EXCLUSIVE REMEDY
SHALL BE REPAIR OR REPLACEMENT AS PROVIDED ABOVE. HOWEVER IF THAT REMEDY FAILS
OF ITS ESSENTIAL PURPOSE, WE RESERVE THE RIGHT TO REFUND THE PURCHASE PRICE OF THE
PRODUCT TO THE PURCHASER IN EXCHANGE FOR THE RETURN OF THE PRODUCT. WE SHALL NOT
BE LIABLE FOR ANY DAMAGES INCLUDING, BUT NOT LIMITED TO, DIRECT, INDIRECT, INCIDENTAL
OR CONSEQUENTIAL DAMAGES, LOSS OF USE OR DATA, LOSS OF PROFITS OR INTERRUPTION
OF BUSINESS, WHETHER SUCH ALLEGED DAMAGES ARE BASED IN WARRANTY, TORT (INCLUDING
NEGLIGENCE AND STRICT LIABILITY, BUT EXCLUDING PERSONAL INJURY), CONTRACT, OR
INDEMNITY.
8. Other Rights
If your country or state does not allow any limitation or exclusion by its law, above terms may not
apply to you.
9. Others
· Please keep your proof of purchase safe for future reference.
· FUJITSU TEN LIMITED is not liable for transportation and installation charges.
· The maximum liability of FUJITSU TEN LIMITED will not exceed the retail price actually paid.
See the owner’s manual for further information on repairs after the Warranty Period or the storage period
of spare parts.
FUJITSU TEN LIMITED.
2-28, Gosho-dori 1-chome, Hyogo-ku, Kobe,
Hyogo, Japan 652-8510
+81-78-671-5081
8
ImportantSafetyInstructionsand
After-SalesService1
9
Garantie1
4
Adaptateursecteur1
5
Câbled’alimentation1*
* Lorsquedeuxtypesdecâblessontinclus,utilisezceluipossédantlacheadaptéeàvotreprise.

3
Prises
Nº Prise Utilisation
1
Prised’entréeélectrique Connectezl’adaptateursecteurinclus.
2
PriseAUXIN(prisestéréo3,5mm)
Connectezuntéléviseur,lecteurCDouunautredispositifexterne.
Utilisezuncâbleaudiodisponibledanslecommerceavecuneche
stéréo3,5mm.
3
PriseUSB(typeA) ConnectezuniPhone,iPodouiPad.UtilisezlecâbleLightningvers
USBoule30brochesversUSBinclusavecvotredispositif.
4
PriseUSB(typeB) ConnectezunMacouPCWindows.UtilisezuncâbleUSBA-B
disponibledanslecommerce(câbleUSBpourimprimante).
5
Prisedesortiedel’enceintedecanalgauche
(Tailleducâble:1,5m) Connectez-laàlaprised’entréedel’enceintedecanalgauche.
6
Prised’entréedel’antenne Connectezl’antenneWi-Fiincluse.
7
Prised’entréedel’enceintedecanalgauche Connectez-laàlaprisedesortiedel’enceintedecanalgauche.
Enceintedecanaldroit Enceintedecanalgauche
1
2
3
4
5
67

4
Préparation des enceintes
Ajustement de l’angle de l’enceinte
+10°
+20°
Vouspouvezajusterl’enceintesurl’angledevotrechoix,de0º
(horizontal),10ºet20º.
1 Couchez l’enceinte de côté.
Lorsquevouscouchezl’enceintedecôté,utilisezunchiffon
douxouautreobjetsimilairepourempêchertouterayure.
2 Déplacez le levier dans la direction indiquée
sur l’image
1
pour déverrouiller.
3 Ajustez l’enceinte sur l’angle de votre choix.
4 Déplacez le levier dans la direction indiquée
sur l’image
2
pour verrouiller.
Fixation des filets de protection
Fixez les lets de protection, par exemple, lorsque l’enceinte
n’estpasutiliséeousivoussouhaitezlesxer.
1 Fixez les filets de protection comme
indiqué sur l’image.
Connexion à l’alimentation
Pour connecterl’alimentaitondelaTD-M1, suivezla procédure
suivante.
1 Connectez la prise de sortie de l’enceinte
de canal gauche sur la prise d’entrée de
l’enceinte de canal gauche.
2 Connectez la fiche d’alimentation et
l’adaptateur secteur inclus.
3 Connectez l’adaptateur secteur inclus à la
prise d’alimentation électrique de la TD-M1.
4 Connectez la fiche d’alimentation à une
prise de votre domicile.
 6
7
8
9
10
11
12
13
14
15
16
17
18
19
20
21
22
23
24
25
26
27
28
6
7
8
9
10
11
12
13
14
15
16
17
18
19
20
21
22
23
24
25
26
27
28
1
/
28
100%